
I started learning about Github Pages and Jekyll a couple weeks ago (tl;dr, my wife’s old blogs that she never writes in anymore kept getting hacked, and I needed to port them from Wordpress to ANYTHING ELSE). Once I settled on Github Pages + Jekyll as a solution, I had to struggle a bit through the following:
- Getting Github Pages set up
- Learning what the crap Jekyll is and how to use it
- DNS hackery
- Password-protecting the site
- Porting a bunch of wordpress posts into Jekyll
- Porting a bunch of wordpress assets into Jekyll
Most people won’t care about the bottom three items in that list, so this post is going to focus on just the top three.
Step 1. Setting up Github Pages
Github Pages is a way to statically host web content (for FREE) that gives you a bunch of niceties for free, such as:
- HTTPS (in 2019, this is just expected)
- CDN (no more “hug of death” whenever you finally write that popular article)
- Source control! Duh!
The easiest way to get started is to create a repository called [your-username].github.io. This will automatically give you a Github Pages site that just shows your README.md at the root index. If you head over to settings, you’ll see something like this (I chose this screen capture for clarity, these settings are for my main github account, not this website):
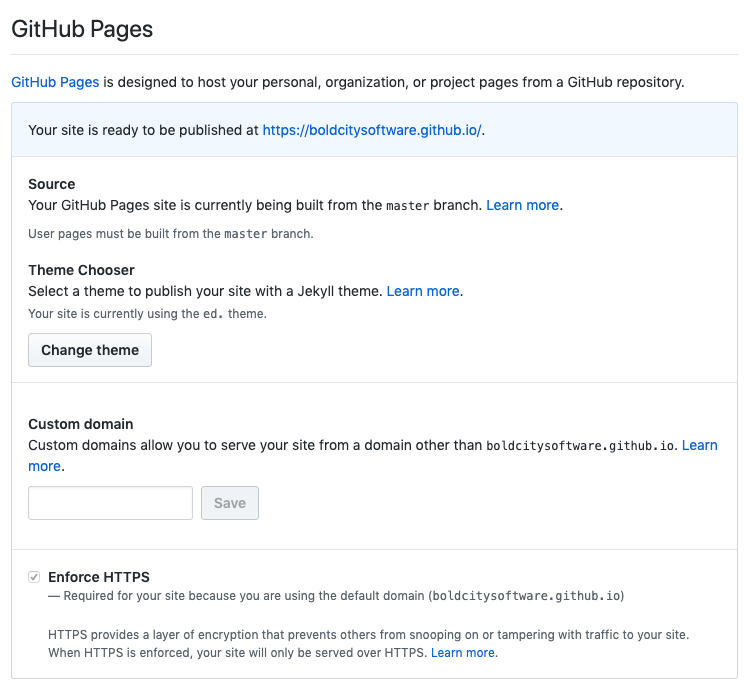
Do yourself a favor and check the box that says Enforce HTTPS if it isn’t already. You’re welcome! If you want, you can set up a custom domain (provided you own one), but we’ll cover that later in this article. For now, let’s take a look at Jekyll.
Step 2. Jekyll Setup
Github Pages will automatically build and serve up your Jekyll site. It even has some settings that allow you to choose a template. I personally hated all the provided templates, and pulling in a custom one is incredibly easy, so here’s how it’s done.
- Find a template you like (I used this free one for this site, thanks Samarjeet!)
- Either find the .zip or clone a copy of the git repository containing the template files and replace your own repository’s files with those
- Find the _config.yml in the root directory and update the information in there to be what you want it to be.
- Make any other edits to the template you’d like (at minimum, I recommend replacing certain image assets such as headshot photos and favicon.ico)
- Write your first post and put it in the _posts folder (you should probably just adapt this whatever sample was in there to begin with).
- Push to your repository and watch it magically update!
If you want to build and test your site locally, you’ll need to install Jekyll. Go check out the quick start guide and documentation here.
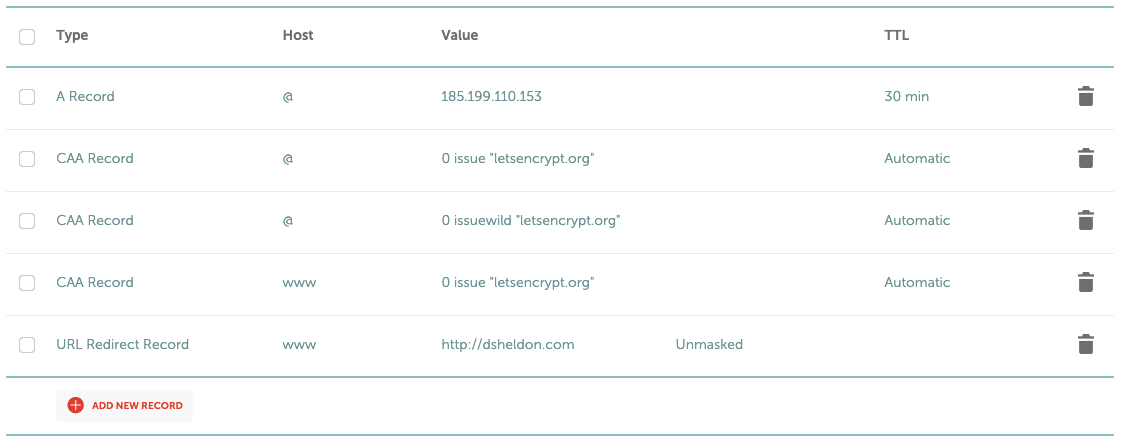
Step 3. DNS Updates (Custom Domains Only)
If you’d like to serve your Github Pages site from a custom domain, there are a few steps involved.
- Change the A record for your domain to point to one of the I.P. addresses that Github Pages recommends.
- Add CAA records for letsencrypt.org.
- Optionally add a URL Redirect Record for
wwwtohttp://yourdomain.com
Here’s a screen capture of the DNS settings for this site:
NOTE: It can take a couple of days for your DNS settings to refresh and for the SSL certificate to be created. Once a couple days have gone by, you should be able to see a 404 from Github saying your site isn’t found. That’s your queue to go add the custom domain in the Github Pages settings. Also, Sometimes the SSL certificate from Let’s Encrypt isn’t ready right away. If you get a message saying so, just wait another day or two and toggle the setting off and on again, and you should be all set!
Thanks for reading! And as always, if you'd like to leave a comment, go @ me on Twitter.